
For many organizations, Slack is one of the most essential messaging apps used for important and sensitive communications. DNIF can collect, normalize, and monitor Slack audit logs to help you identify suspicious activity within your Slack workspace in real time.
Pre-requisites
- Slack API Token
Steps to derive prerequisites
- Create Slack App with Permissions
- Navigate to the Slack Apps page.
- Click Create New App.
- Select From scratch if asked how you would like to configure your Slack app.
- Provide a App Name for your Slack App and select the Workspace you want to monitor and install the Slack App in.
- Click Create App.
- You are now presented with the basic information about your Slack app. Click Permissions in the Add features and functionality section.
- Scroll down to the Scopes section add multiple User Token Scopes (admin, auditlogs:read) depending on your Slack account type.
- Install the Slack App on the Enterprise Grid for Audit API Logs
- Make sure you have followed the prior steps for creating the Slack app with the appropriate permissions before continuing to this section. A Slack Enterprise Grid account is required.
- On the app settings page, click OAuth & Permissions.
- Scroll down to Redirect URLs. Add a new redirect URL as `https://localhost` and click Save URLs.
- Go to Manage Distribution > Share Your App with Other Workspaces
- Open the Remove Hard Coded Information section on the same page and check the I’ve reviewed and removed any hard-coded information checkbox. Click the Activate Public Distribution button.
- Copy the shareable link and ensure the permissions are correct from the prior table.
- Open a new tab in your browser, paste the URL and press Enter.
- Select the dropdown menu in the upper right corner and choose the correct organization.
- Click Allow.
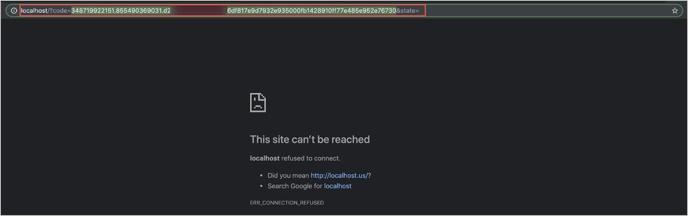
- Ignore the error message and copy the Code in the URL field, as shown in the following example and save it some where for further use.
- Get the client ID and client secret from the Basic information of your Slack app and save it some where for further use. Replace the `<CODE>`, `<CLIENT_ID>` and `<CLIENT_SECRET>` variables in the following URL:
https://slack.com/api/oauth.v2.access?code=<CODE>&client_id=<CLIENT_ID>&client_secret=<CLIENT_SECRET>
- Open a new browser tab and paste the URL from the previous step into the URL field, then press Enter.
- From the response, save the token value from the field `access_token` as it will be used for the DNIF Data Source.
{

 "ok": true,

 "access_token": "xoxp-1236544616-Example-Access-Token5bf71298dad60d941f2a44b371",

 "scope": "admin,identify,channels:history,groups:history,im:history,channels:read,team:read,users:read,users:read.email,auditlogs:read",

 "user_id": "WA7PQK3U5",

 "team_id": "EFSFVS",

 "enterprise_id": "EASFEF",

 "team_name": "Test Slack App"

}
Configurations
The following are the configurations to forward Slack Connector logs to DNIF. HYPERCLOUD.
|
Field Name |
Description |
|
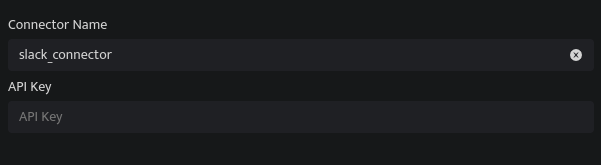
Connector Name |
Enter a name for the connector |
|
API Key |
Enter the Slack API Token |
- Click Save after entering all the required details and click Test Connection, to test the configuration.
- A Connection successful message will be displayed on screen along with the time stamp.
- If the connection is not successful an error message will be displayed. Refer Troubleshooting Connector Validations for more details on the error message.
Once the connector is configured, validate if the connector is listed under Collection Status screen with status as Active. This signifies the connector is configured successfully and data is ready to ingest.