The Mimecast connector supports collecting SIEM, DLP, Audit, and Hold Message List data from the Mimecast API. DNIF can collect, normalize, and monitor Mimecast logs to help you identify suspicious activity within your workspace in real time.
Pre-requisites
- Client ID
- Client Secret
Steps to derive prerequisites:
- NOTE: The user account associated with your Mimecast credentials needs to have basic administrator access
- For Email Security Cloud Gateway customers:
Follow this document Email Security Cloud Gateway.
- For Email Security Cloud Integrated customers:
Follow this document Email Security Cloud Integrated.
- To get the following log sources from Mimecast kindly allow the respective permission:
- SIEM Logs - In order to use this endpoint the logged in user must be a Mimecast Administrator with atleast the Security Events and Data Retrieval | Threat and Security Events (SIEM) | Read permission.
Allow Logging by following this document (https://developer.services.mimecast.com/siem-guidelines) - DLP Logs - In order to successfully use this endpoint the role assigned to the app must have at least the following level of application permissions granted Monitoring | Data Leak Prevention | Read.
- Audit Events - In order to successfully use this endpoint the role assigned to the app must have at least the following level of application permissions granted Account | Logs | Read.
- Hold Message List - In order to successfully use this endpoint the role assigned to the app must have at least the following level of application permissions granted Account | Dashboard | Read.
Configurations
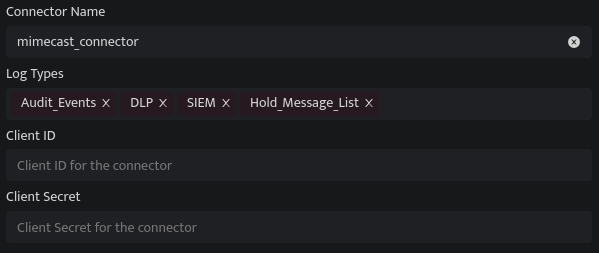
The following are the configurations to forward Mimecast Connector logs to DNIF.

|
Field Name |
Description |
|
Connector Name |
Enter a name for the connector |
|
Log Types |
Enter Mimecast Log Types |
|
Client ID |
Enter the Mimecast API Client ID |
|
Client Secret |
Enter the Mimecast API Client Secret |
- Click Save after entering all the required details and click Test Connection, to test the configuration.
- A Connection successful message will be displayed on screen along with the time stamp.
- If the connection is not successful an error message will be displayed. Refer Troubleshooting Connector Validations for more details on the error message.
Once the connector is configured, validate if the connector is listed under Collection Status screen with status as Active. This signifies the connector is configured successfully and data is ready to ingest.
