
Cortex XDR is a detection and response app that natively integrates network, endpoint and cloud data to stop sophisticated attacks. It accurately detects threats with behavioral analytics and reveals the root cause to speed up investigations. It provides access to raw logs of incidents.
An attack can affect several hosts or users and raises different alert types stemming from a single event. All artifacts, assets, and alerts from a threat event are gathered into an Incident. Using this SIEM Connector, you can seamlessly ingest Cortex XDR Incident Logs into DNIF.
This integration empowers your Security Information and Event Management (SIEM) system with enriched threat intelligence, enhancing overall visibility and aiding in comprehensive security analytics.
Pre-requisites
- FQDN:
- The FQDN is a unique host and domain name associated with each tenant. When you generate the API Key and Key ID, you are assigned an individual FQDN.
- API Key:
- The API Key is your unique identifier used as the "Authorization:{key}" header required for authenticating API calls.
- Depending on your desired security level, you can generate two types of API keys, Advanced or Standard, from your Cortex XDR app.
- API Key ID:
- The API Key ID is your unique token used to authenticate the API Key. The header used when running an API call is "x-xdr-auth-id:{key_id}".
Reference Document:
https://docs-cortex.paloaltonetworks.com/r/Cortex-XDR/Cortex-XDR-API-Reference/Get-Started-with-APIs
Steps to derive prerequisites:
- Get your Cortex XDR API Key
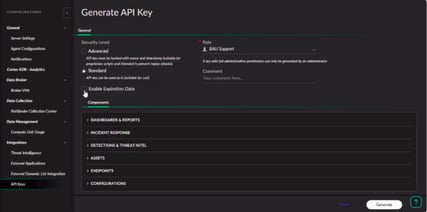
- In Cortex XDR, navigate to Settings → Configurations → Integrations → API Keys.
-
-
- Select + New Key.
- Choose the type of API Key (Advanced or Standard) based on your desired security level.
- If using the Advanced API key, consider enabling the expiration date and provide a comment.
- Select the desired level of access for this key.
- Generate the API Key.
- Copy the API key, and then click Done. This value represents your unique Authorization:{key}.
Note: You will not be able to view the API Key again after this step, so ensure that you copy it before closing the notification.
-
2. Get your Cortex XDR API Key ID.
- In the API Keys table, locate the ID field.
- Note your corresponding ID number. This value represents the x-xdr-auth-id:{key\_id} token.
3. Get your FQDN.
- Select your API key and click Copy URL .
Cortex XDR API URIs are made up of your unique FQDN, the API name, and the endpoint.
For example, https://api-{fqdn}/public_api/v1/{name of api}/{name of call}/.
Don’t forget to replace the example variables with your unique API key, API key ID, and FQDN tenant ID.
To authenticate the URL generated after replacing the variables, you can simply execute the CURL command or use Python.
Standard Key cURL Example
curl -X POST https://api-{fqdn}/public_api/v1/{name of api}/{name of call}/
-H "x-xdr-auth-id:{key_id}"
-H "Authorization:{key}"
-H "Content-Type:application/json"
-d '{}'
Standard Key Python 3 Example
import requests
def test_standard_authentication(api_key_id, api_key):
headers = {
"x-xdr-auth-id": str(api_key_id),
"Authorization": api_key
}
parameters = {}
res = requests.post(url="https://api-{fqdn}/public_api/v1/{name of api}/{name of call}",
headers=headers,
json=parameters)
return res
After you verify authentication, you add credentials to Cortex XDR connector configuration.
Configurations
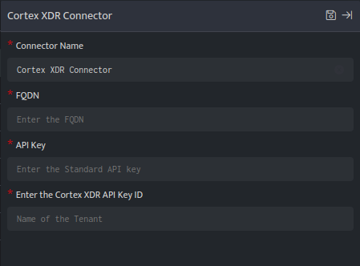
The following are the configurations to forward Cortex XDR Connector logs to DNIF.
| Field Name | Description |
| Connector Name | Enter a name for the connector |
| FQDN | Enter the FQDN for Connector |
| API Key | Enter the API key for the connector |
| API Key ID | Enter the Cortex XDR API Key ID |
- Click Save after entering all the required details and click Test Connection, to test the configuration.
- A Connection successful message will be displayed on screen along with the time stamp.
- If the connection is not successful an error message will be displayed.
Refer Troubleshooting Connector Validations for more details on the error message.
Once the connector is configured, validate if the connector is listed under Collection Status screen with status as Active. This signifies the connector is configured successfully and data is ready to ingest.