
AWS S3 Optimized Cross Account connector is a variant of the S3 Optimized Connector that reads logs from a configured S3 Bucket by leveraging S3 event notifications pushed to an “AWS SQS Queue”. It varies in a way that we get limited access to your AWS account using an external role without you providing any credentials.
Pre-requisites
- Your DNIF Tenant ID (previously known as cluster id)
- AWS Role ARN with the required permissions
- AWS S3 bucket and SQS Queue must be in the same region
- Enabling and configuring event notifications using the Amazon S3 console
Creating AWS Role ARN with the required permissions
You can create one or more AWS Role to delegate access across AWS accounts using IAM roles
For official documentation Click here
- Sign in to the AWS S3 Management Console and open the IAM console at https://console.aws.amazon.com/iam/.
- You will need the following details to log in to your IAM Console.
- The account alias OR 12-digit AWS account ID.
- The user name for your IAM user.
- The password for your IAM user.
- In the navigation pane, choose Roles and then choose Create role.
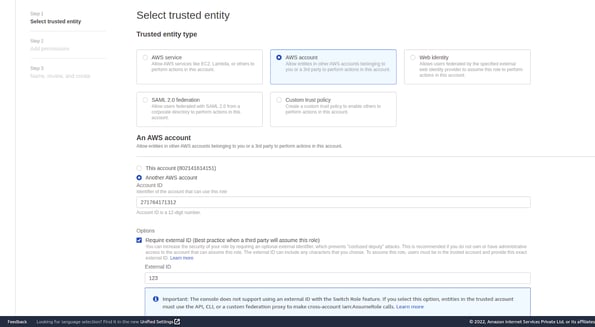
- Choose AWS account as trusted entity type
- For Account ID, type the following account ID (DNIF PROD ACC ID)
- For an external ID please enter your DNIF tenant ID (previously known as cluster id) which can be seen in the URL of any page after you log in to your DNIF Console.

- Leave the rest of the options un-selected.
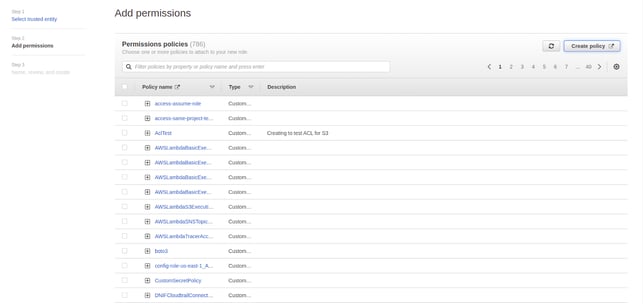
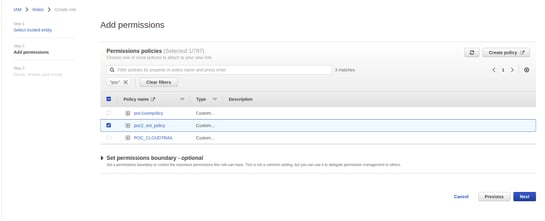
- Click on next to add permissions to this role
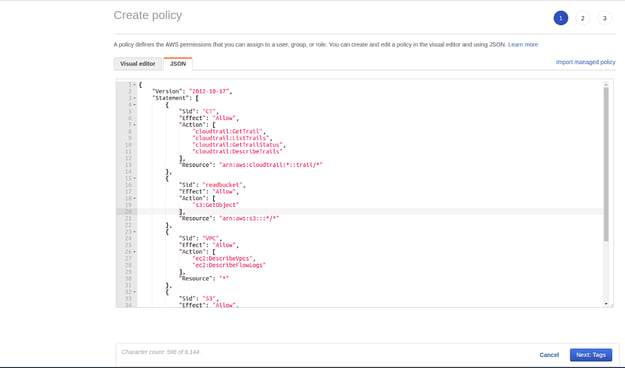
- Create a new policy or attach an existing policy with the following permissions.
{
    "Version": "2012-10-17",
    "Statement": [
        {
            "Sid": "CT",
            "Effect": "Allow",
            "Action": [
                "cloudtrail:*"
            ],
            "Resource": "*"
        },
        {
            "Sid": "readbucket",
            "Effect": "Allow",
            "Action": [
                "s3:GetObject"
            ],
            "Resource": "arn:aws:s3:::*/*"
        },
        {
            "Sid": "VPC",
            "Effect": "Allow",
            "Action": [
                "ec2:DescribeVpcs",
                "ec2:DescribeFlowLogs"
            ],
            "Resource": "*"
        },
        {
            "Sid": "S3",
            "Effect": "Allow",
            "Action": [
                "s3:ListBucket",
                "s3:ListAllMyBuckets",
                "s3:GetBucketLogging",
                "s3:GetBucketNotification",
                "s3:GetBucketLocation"
            ],
            "Resource": "arn:aws:s3:::*"
        },
        {
            "Sid": "SQS",
            "Effect": "Allow",
            "Action": [
                "sqs:DeleteMessage",
                "sqs:ListQueues",
                "sqs:GetQueueUrl",
                "sqs:ReceiveMessage",
                "sqs:GetQueueAttributes"
            ],
            "Resource": "arn:aws:sqs:*:*:*"
        }
    ]
}
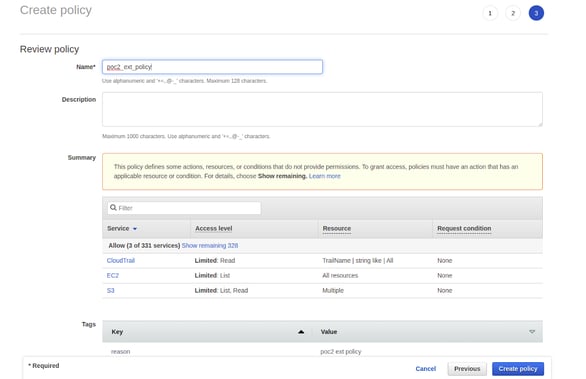
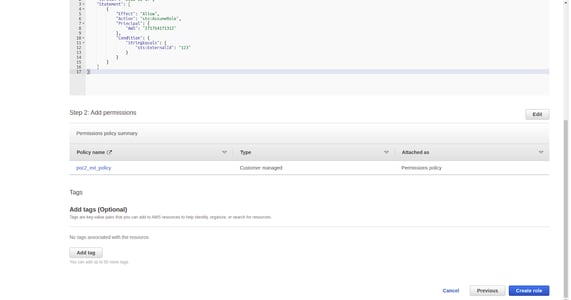
- Attach this newly created policy to the role
- Name, review and finish creating this role.
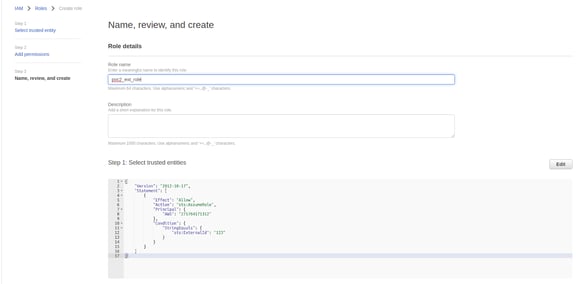
- Note the ARN of this newly created role.
Creating an Amazon SQS Queue
Follow the steps to create and subscribe to an Amazon Simple Queue Service (Amazon SQS) queue.
- Open the Amazon SQS console at https://console.aws.amazon.com/sqs/.
- Choose Create queue.
- On the Create queue page, specify the correct region. (Please select the same region as AWS S3 Bucket region)
- Choose the Standard queue type.
- Enter a Name for your queue and choose Create Queue.
- Find the newly created queue and replace the access policy attached to the queue with the following policy.
- Choose the queue name in the Amazon SQS console in the Queues list.
- On the Access policy tab, choose Edit.
- Replace the access policy attached to the queue with the following policy, updating the Amazon SQS ARN, source bucket name, and bucket owner account ID.
{
 "Version": "2012-10-17",
 "Id": "example-ID",
 "Statement": [
  {
   "Sid": "example-statement-ID",
   "Effect": "Allow",
   "Principal": {
    "Service": "s3.amazonaws.com"
   },
   "Action": [
    "SQS:SendMessage"
   ],
   "Resource": "SQS-queue-ARN",
   "Condition": {
      "ArnLike": { "aws:SourceArn": "arn:aws:s3:*:*:awsexamplebucket1" },
      "StringEquals": { "aws:SourceAccount": "bucket-owner-account-id" }
   }
  }
 ]
}
Enabling and configuring event notifications using the Amazon S3 console
To enable and configure event notifications for the target S3 bucket
- Sign in to the AWS Management Console and open the Amazon S3 console at https://console.aws.amazon.com/s3/.
- In the Buckets list, choose the name of the bucket you want to enable events for.
- Choose Properties.
- Navigate to the Event Notifications section and choose Create event notification.
- In the General configuration section, specify a descriptive event name for your event notification. Optionally, you can specify a prefix and a suffix to limit the notifications to objects with keys ending in the specified characters.
- Enter a description for the Event name: If you don't enter a name, a globally unique identifier (GUID) is generated and used for the name.
- To optionally filter event notifications by prefix, enter a Prefix. For example, you can set up a prefix filter so that you receive notifications only when files are added to a specific folder (for example, images/).
- To optionally filter event notifications by suffix, enter a Suffix. For more information, see Configuring event notifications using object key name filtering.
- In the Event types section, select All object create events to receive notifications for all object creation event types.
- In the Destination section, choose the event notification destination.
- Select the destination type: SQS Queue
- After you choose your destination type, choose the queue from the list. Note: the list will show only the queues created in the same region as the S3 bucket.
- Choose Save changes, and Amazon S3 sends a test message to the event notification destination.
Configurations
The following are the configurations to forward AWS S3 Optimized Cross Account Connector logs to DNIF.
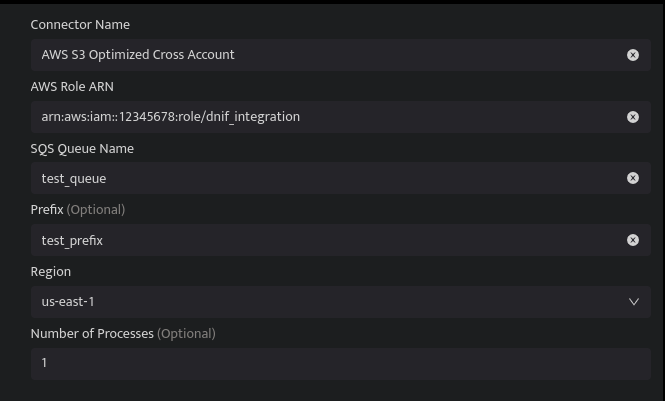
| Field Name | Description |
| Connector Name | Enter a name for the connector |
| Connector Type | Enter AWS S3 Optimized Cross Account Connector |
| AWS Role ARN | Enter the ARN of Amazon Role |
| SQS Queue Name | Enter the name of Amazon SQS Queue |
| Region | Select one region for the AWS S3 Bucket and SQS Queue
|
| Number of Process (Optional) | Enter Number of processes. By default set to one |
- Click Save, to forward AWS S3 Optimized Cross Account Connector logs to DNIF.