
AWS S3 Optimized connector is a scalable variant of the S3 Connector that reads logs from a configured S3 Bucket by leveraging S3 event notifications pushed to an “AWS SQS Queue”.
Pre-requisites
- Connectivity with AWS S3 bucket and Amazon SQS Queue using valid credentials
- Required credentials:
- AWS_SECRET_ACCESS_KEY
- AWS_ACCESS_KEY_ID
- AWS account id
- AWS Bucket name
- AWS SQS Queue name
- Region
- AWS S3 bucket and SQS Queue must be in the same region
- Required Permissions related to AWS S3 bucket and SQS Queue
Creating IAM user with programmatic access
You can create one or more IAM users in your AWS account. You might create an IAM user when someone joins your team, or when you create a new application that needs to make API calls to AWS.
For official documentation Click here
-
Sign in to the AWS S3 Management Console and open the IAM console at https://console.aws.amazon.com/iam/.
-
You will need one of the following details to login to IAM Console.
- The account alias OR 12-digit AWS account ID.
- The user name for your IAM user.
- The password for your IAM user.
-
If you are a root user or IAM administrator and need to provide the AWS account ID or AWS account alias to an IAM user, view Your AWS account ID and its alias.
-
If you are an IAM user, you can log in using either a sign-in URL or the main sign-in page.
-
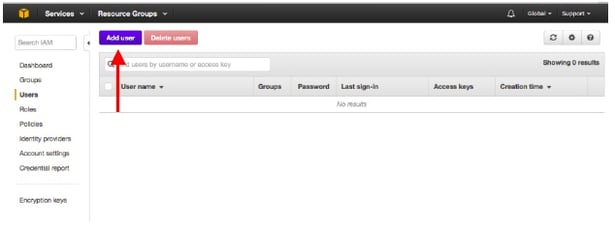
In the navigation pane, choose Users and then choose Add user.
-
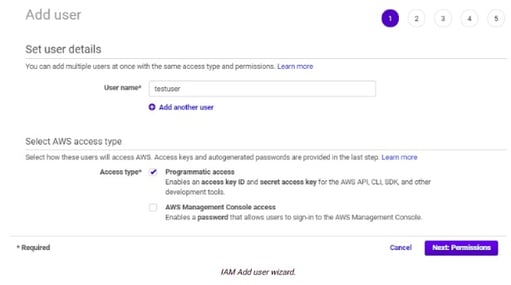
Enter the user name for the new user. This is the sign-in name for AWS S3.
-
On the same screen, under "Select AWS access type", check the checkbox to enable AWS Management Console access.
-
Select programmatic access as access type for this user.
-
Choose Next: Permissions.
-
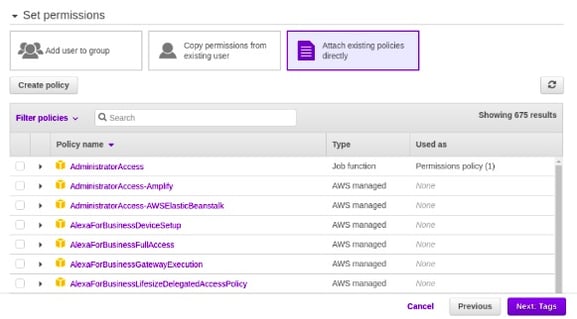
On the Set permissions page, specify how you want to assign permissions to this set of new users. Choose Attach existing policies directly > Create Policy
- Create policy using json method
- Following is the required policy in json format
{
    "Version": "2012-10-17",
    "Statement": [
        {
            "Effect": "Allow",
            "Action": [
                "sqs:DeleteMessage",
                "s3:GetObject",
                "sqs:ListQueues",
                "sqs:GetQueueUrl",
                "sqs:ReceiveMessage",
                "sqs:GetQueueAttributes",
                "s3:ListBucket"
            ],
            "Resource": "*"
        }
    ]
}
-
You can find the newly created policy in Attach existing policies directly
-
Apply the policy to the IAM user.
-
Click Next : Tags button

-
Add user tags for identification purpose and click Next:Review button.
-
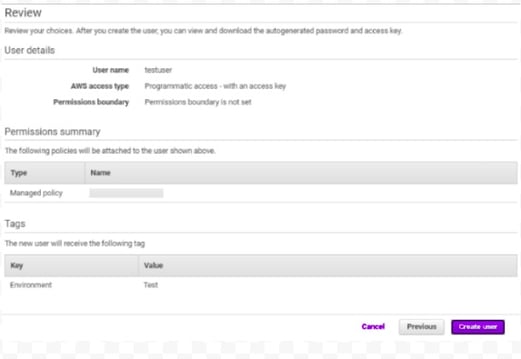
Review all the configurations and click Create user button.
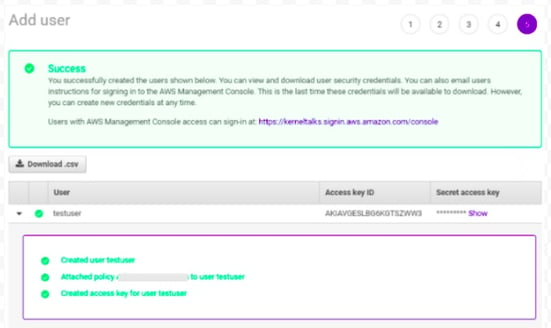
-
Click Download .csv, to download the key pair or click Show link under the Secret access key and then copy/save both the Access key ID and Secret access key.
In case of an already existing IAM user, create access keys using the steps mentioned here: AWS Account and Access Keys
In case of ingesting multiple service logs, there should be a separate account for every S3 bucket.
The supported log types are .json.gz, .log.gz, .txt.gz, .gz, .json, .txt, .log
Creating an Amazon SQS Queue
Follow the steps to create and subscribe to an Amazon Simple Queue Service (Amazon SQS) queue.
- Open the Amazon SQS console at https://console.aws.amazon.com/sqs/.
- Choose Create queue.
- On the Create queue page, specify the correct region.(Please select the same region as AWS S3 Bucket region)
- The Standard queue type is selected by default.
You can't change the queue type after you create a queue.
- Enter a Name for your queue.
- Scroll to the bottom and choose Create Queue. Amazon SQS creates the queue and displays the queue's Details page.
Amazon SQS propagates information about the new queue across the system. Because Amazon SQS is a distributed system, you may experience a slight delay before the queue is displayed on the Queues page.
- Replace the access policy attached to the queue with the following policy.
- In the Amazon SQS console, in the Queues list, choose the queue name.
- On the Access policy tab, choose Edit.
- Replace the access policy attached to the queue with the following policy, updating the Amazon SQS ARN , source bucket name , and bucket owner account ID.
{
  "Version": "2012-10-17",
  "Id": "example-ID",
  "Statement": [
{
 "Sid": "example-statement-ID",
 "Effect": "Allow",
 "Principal": {
 "Service": "s3.amazonaws.com"
},
 "Action": [
 "SQS:SendMessage"
],
"Resource": "SQS-queue-ARN",
"Condition": {
    "ArnLike": { "aws:SourceArn":"arn:aws:s3:*:*:awsexamplebucket1" },
   "StringEquals": { "aws:SourceAccount": "bucket-owner-account-id" }
   }
  }
 ]
}
-
Get Amazon SQS ARN
- Navigate to the SQS Queue Page
- Select the queue you created
- On queue's Details page, get the value ARN column
-
Source bucket name: name of the bucket created above
-
Bucket owner account ID:
- The account ID of the user who created the S3 Bucket
- How to get Account ID?
- In the navigation bar, choose Support , and then Support Center. Your currently signed-in 12-digit account number (ID) appears in the Support Center navigation panel.
-
Choose Save.
-
Note the queue ARN
- The SQS queue you created is another resource in your AWS account, and it has a unique Amazon Resource Name (ARN). You will need this ARN in the next step. The ARN will be of the following format:
arn:aws:sqs:_aws-region_:_account-id_:_queue-name
- The SQS queue you created is another resource in your AWS account, and it has a unique Amazon Resource Name (ARN). You will need this ARN in the next step. The ARN will be of the following format:
For every bucket, there should be a separate SQS queue and the property of the bucket should be set accordingly. i.e. One connector will listen to only one bucket. In case data needs to be ingested from a different bucket, then a separate SQS Queue needs to be configured.
Enabling and configuring event notifications using the Amazon S3 console
To enable and configure event notifications for an S3 bucket
- Sign in to the AWS Management Console and open the Amazon S3 console at https://console.aws.amazon.com/s3/.
- In the Buckets list, choose the name of the bucket that you want to enable events for.
- Choose Properties.
- Navigate to the Event Notifications section and choose Create event notification.
- In the General configuration section, specify a descriptive event name for your event notification. Optionally, you can also specify a prefix and a suffix to limit the notifications to objects with keys ending in the specified characters.
- Enter a description for the Event name.
If you don't enter a name, a globally unique identifier (GUID) is generated and used for the name. - To optionally filter event notifications by prefix, enter a Prefix.
For example, you can set up a prefix filter so that you receive notifications only when files are added to a specific folder (for example, images/). - To optionally filter event notifications by suffix, enter a Suffix.
For more information, see Configuring event notifications using object key name filtering.
- Enter a description for the Event name.
- In the Event types section, select All object create events to receive notifications for all object creation event types.
- In the Destination section, choose the event notification destination.
- Select the destination type: SQS Queue
- After you choose your destination type, choose the queue from the list.
The list will show only the queues created in the same region as the S3 bucket.
- Choose Save changes , and Amazon S3 sends a test message to the event notification destination.
Configurations
The following are the configurations to forward AWS S3 Optimized Connector logs to DNIF.
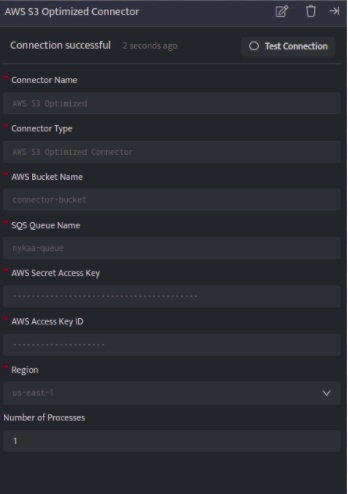
| Field | Description |
| Connector Name | Enter a name for the connector |
| Connector Type | Enter AWS S3 Optimized Connector |
| AWS Bucket Name | Enter the name of the AWS S3 Bucket |
| SQS Queue Name | Enter the name of Amazon SQS Queue |
| AWS Secret Access Key | Enter the AWS_SECRET_ACCESS_KEY received from AWS S3 credentials |
| AWS Access Key ID | Enter the AWS_SECRET_ACCESS_ID received from a AWS S3 credentials |
| Region | Select one region for the AWS S3 Bucket and SQS Queue
|
| Number of Process (Optional) | Enter Number of processes, By default set to one |
- Click Save, to forward AWS S3 Optimized Connector logs to DNIF.
Once the connector is configured, validate if the connector is listed under Collection Status screen with status as Active. This signifies the connector is configured successfully and data is ready to ingest.